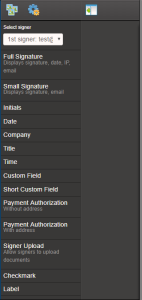
Document Editor
The Document Editor appears when you select Prefill/Add Locations for a document you upload as part of a file, rather than selecting a document from your Document Library.
Using the Document Editor, you can apply the standard signature fields to your signature documents, without needing to manually place the code in your documents. Instead, you can drag and drop the fields you want, place them on your document, click Save, and then send your document for signature.
It's a best practice to add signature fields in this manner when you upload a one-off custom document for signature.
Adding signature fields via the Document Editor
To add signature fields via the Document Editor:
- Create your file.
- Scroll down to the Signature Documents card, and then select Choose File.
- Navigate to the file you want to include, and then click Open.
- Click Add/Edit Locationsnext to the file name. The Document Editor opens.
- (Optional) Select the Signer Level from the dropdown for the field you're applying.
- Click, and then drag the Sertifi Data Field you want to add to your document from the blue bar. Choose from:
- Full Signature – you can only use a full signature stamp once per signing level to collect a signature with additional information. This field displays the following information:
- Signed name
- Signed date and time
- Signer's email address
- Signer's IP address
- Unique Document ID
- Small Signature – you can use this box as many times as you need in a document to collect a signature. This box displays the signed name and signer's email address.
- Initials – you can use this box as many times as you need in a document to collect initials. This box displays the signer's initials.
- Date – you can use this box as many times as you need in a document to collect the date the signer completes the document. This box displays the date of signing.
- Company – you can use this box as many times as you need in a document to collect the company name of the signer. This box displays only the company name.
- Title – you can use this box as many times as you need in a document to collect the title of the signer. This box displays only the title of the signer.
- Custom Field – you can use custom fields as many times as you need in a document to collect data that's important to your document. The custom field displays whatever information you specify to collect. Enter the custom information in the Custom Text box before you select the field.
- Short Custom Field - you can use small custom fields as many times as you need in a document to collect data that's important to your document. The small custom field displays whatever information you specify to collect. Enter the custom information in the Custom Text box before you select the field.
- In Document Payment Authorization – you can use this authorization graphic as many times as you need in a document to collect payment information from the signer. You have the option to choose whether or not the address displays with the authorization. This graphic displays the following information:
- Last four digits of the credit card number
- Card type
- Approval date
- ID of the transaction
- Signer Upload Button – you can use this button as many times as you need in a document to collect required files from the signer. Each time you add this button, the signer is required to upload at least one document. After upload, this button displays the name of the uploaded file, and the download location.
- Checkmark - you can use as many checkmarks as you want. Select this to add a checkmark to the document.
- Label - you can use as many labels as you want. Select Label, and then enter the text you want in the popup, and then click Ok.
- Full Signature – you can only use a full signature stamp once per signing level to collect a signature with additional information. This field displays the following information:
- Repeat steps 4-6 for each Sertifi Data Field you want to add.
- Click Save.
- Click Exit. Your signature location template is complete.
If you add a Sertifi Data Field in error, click the X in the upper right corner of the field.
Additional Document Editor functionality
Along the top of the Document Editor, you can control your view using the following buttons:


- Thumbnail - shows the thumbnail view of your document, including all pages, in the left margin.
- Location Tools - shows a list of the Sertifi Data Fields available for placement on your document. Use this button to toggle this view on/off.
- Sidebar - expand and collapse the side bar.
- Save - saves your document.
- Exit - exits the Document Editor.

